Just like any other instrument, accessories have been designed for telescopes too. Some accessories are indispensable while others are need-based enhancements. It is also worth noting that telescopes generally come pre-packaged with some accessories. So, it becomes an important factor when buying a telescope.
We will see the various accessories, categorizing them as either Indispensable or Need-based. As the title suggests, this post will focus on the indispensable ones. We will cover the need-based enhancements in the next post The Luxuries.
Mounts
Backbones of the telescopes, as described in the previous post, mounts are the holders of the telescopes. A perfect analogy to telescope mounts is the tripod used for cameras. Now, cameras are so portable, then why do we need mounts for them? That’s because we want to keep the cameras stable while clicking pictures in order to avoid distortions due to movement, and also for selfies. Although some telescopes (usually the terrestrial ones) are so light that they can be hand-held, but we still keep them on mounts like tripods to keep them affixed in one place (could be rotated on an axis though) for several reasons much like the cameras. However, astronomical telescopes are so gigantic and bulky that they need to be placed on a mount. Imagine carrying a telescope, weighing over 30 lbs, on your shoulder and aiming at different objects in the sky. That’s just plain absurd. Although, in older times, soldiers used to carry cannon guns, weighing over 40lbs, on their shoulders around. But times have changed. Haven’t they?
Like I said before, it’s not just the weight, we also want the telescopes to remain stable in order to capture distortion-free views and in some cases even track the objects. Also, as noted in the previous post, mounts can be manual or GoTo (computerized). Let’s first refresh our memory on that before we go into the more granular categorization.
Before we talk about the manual and GoTo mounts, there is something you should be aware of. In the usual jargon, the term telescope could refer to the entire assembly, which constitutes the mount and the telescope (the optical tube). The optical tube in that case is generally referred to as the OTA (Optical Tube Assembly).
Now back to the subject.
Manual mounts (sometimes telescopes using that are referred to as manual telescopes), as the name suggests, are non-computerized and need to be maneuvered (not from inside of your home to the backyard but aiming at different parts of the sky). Although mostly manual effort is required, but some manual mounts can be fitted with motor and drives.
GoTo mounts are computerized, which means there is a processing chip on-board that guides the OTA. Telescopes with GoTo mounts are more expensive than the manual counterparts of similar optical construction. GoTo telescopes are usually, as it seems, much easier to use, but more you get used to this computerized version, lesser are your chances of learning about the sky. And that is fine, as long as your primary aim is just stargazing.
Now, let’s dive into the other line of categorization. The two lines of categorization are basically intersecting, which means telescopes categorized in this other line can either be manual or GoTo.
Before we go into further details of this other line of categorization, it is important to understand that any reference to movement when talking about mounts and telescopes can be construed as movement along the axes for pointing to different regions of the sky, and not lateral movement on the floor or carrying them around. Mounts have levers which help the OTA move on different spherical axes (or in different directions). Also, what is worth understanding is the concept of altitude-azimuth.
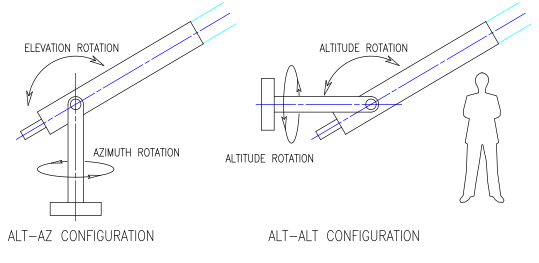
The field of observation of telescopes can be best defined in the spherical coordinate system. The movements of the telescope (mount) can be defined in terms of angular measurements altitude and azimuth. In layman’s terms, let’s just think of the two measurements as vertical and horizontal angles respectively, between the observer and the object being observed. The following diagram can explain it best.

Fixed
As the name suggests, Fixed telescope mounts are entirely fixed in one position, which means no movement in any direction.[1] These are usually used for terrestrial telescopes.
Fixed-altitude
Fixed-altitude mounts usually fixed at an altitude angle (vertically) while rotating horizontally (in azimuth). They can cover the whole sky but only observe objects for the short time when that object passes a specific altitude and azimuth.[2]
Transit
Like Fixed-altitude mounts, transit mounts are single axis, but unlike them, these mounts are fixed in azimuth while rotating in altitude, usually oriented on a north-south axis. This allows the telescope to view the whole sky, but only when the Earth’s rotation allows the objects to cross (transit) through that narrow north-south line (the meridian).[3]
Altazimuth
As the name suggests, Altazimuth (altitude-azimuth, or alt-az) mounts allow the telescope to be moved on both axes. These mounts allow telescopes to be moved in altitude (up and down), or azimuth (side to side), as separate motions. Since the invention of digital tracking systems, altazimuth mounts have come to be used in practically all modern large research telescopes and also very popular in amateur astronomy.
Besides the mechanical inability to easily follow celestial motion the altazimuth mount does have other limitations. The telescope’s field-of-view rotates at varying speed as the telescope tracks, whilst the telescope body does not, requiring a system to counter-rotate the field of view when used for astrophotography or other types of astronomical imaging. The mount also has blind spot or zenith hole, a spot near the zenith where the tracking rate in the azimuth coordinate becomes too high to accurately follow equatorial motion. These mounts also require a third axis to de-rotate the field as the telescope tracks.[4]
Altitude-altitude
Altitude-altitude (or alt-alt) mounts allow the telescopes to move on two vertical (altitude) axes but not horizontally. One of the axes is the same as in altazimuth but the other axis is parallel to the ground as opposed to perpendicular as in altazimuth. These mounts have the advantage of not having a blind spot near the zenith, and for objects near the celestial equator the field rotation is minimized. It has the disadvantage of having all the mass, complexity, and engineering problems of its equatorial counterpart (discussed later), so is only used in specialty applications such as satellite tracking. These mounts may include a third azimuth axis (an altitude-altitude-azimuth mount) to rotate the entire mount into an orientation that allows smoother tracking.[5]
Equatorial
The Equatorial mounts let the telescope follow the rotation of the sky (celestial sphere) by having one rotational axis parallel to the Earth’s axis of rotation. The advantage of equatorial mounts lies in their ability to allow the OTA to stay fixed on any object in the sky that has a diurnal motion (the apparent daily motion of stars around the Earth, or more precisely around the two celestial poles) by driving one axis at a constant speed. Such an arrangement is called a sidereal drive. These mounts are great for tracking. The equatorial axis of the mount is often equipped with a motorized clock drive, that rotates that axis one revolution every 23 hours and 56 minutes in exact sync with the apparent diurnal motion of the sky. Equatorial mounts differ from altazimuth mounts, which require variable speed motion around both axes to track a fixed object in the sky. Although more expensive than the simpler configurations discussed above, the mounts are excellent for astrophotography for reasons which are much evident.[7]

The most popular equatorial mount design is the German equatorial mount (or GEM). In this design, the primary structure is a T–shape, where the lower bar is the right ascension axis (equatorial axis), and the upper bar is the declination axis (perpendicular to the equatorial axis). The telescope is placed on one end of the declination axis, and a suitable counterweight on other end of it. The right ascension axis has bearings below the T-joint, that is, it is not supported above the declination axis.[9]
Then there is the Open Fork mount, that has a fork attached to the right ascension axis at its base. The telescope is attached to two pivot points at the other end of the fork so it can swing in declination. Most modern catadioptric telescopes tend to be of this type. The mount resembles an altazimuth mount, but with the azimuth axis tilted and lined up to match the Earth’s rotation axis with a piece of hardware usually called the wedge.[10]
The English mount or Yoke mount has a frame or yoke with right ascension axis bearings at the top and the bottom ends, and a telescope attached inside the midpoint of the yoke allowing it to swing on the declination axis. The telescope is usually fitted entirely inside the fork, and there are no counterweights as with the German equatorial mount. Most of the mounts of this design have a significant disadvantage. They do not allow the telescope to point too near the north or south celestial pole.[11]
The Horseshoe mount overcomes the design disadvantage of English or Yoke mounts by replacing the polar bearing with an open horseshoe structure to allow the telescope to access Polaris (North Pole star) and stars near it.[12]
The Cross-axis or English cross axis mount is like a big plus sign (+) and is very similar to the GEM in design (which T-shaped). The right ascension axis is supported at both ends, and the declination axis is attached to it at approximately midpoint with the telescope on one end of the declination axis and a counter weight on the other.[13]
An Equatorial platform is a specially designed platform that allows any device sitting on it to track on an equatorial axis. More than a standalone mount, it is more of a platform which can be used by different mounts. It achieves tracking on the equatorial axis by having a surface that pivots about a virtual polar axis. This gives equatorial tracking to anything sitting on the platform, from small cameras up to entire observatory buildings. These platforms are often used with altazimuth mounted telescopes, such as the common Dobsonian telescope type (discussed later), to overcome that type of mount’s inability to track the night sky.[14]
Hexapod
Instead of the classical mounting using two axles in other mounts, these mounts are use six extendable struts. This configuration allows moving the telescope in all six spatial degrees of freedom and also provides a strong structural integrity. This type of mount is not commercially available but is being used in a major research telkescope in Chile, called the Hexapod-Telescope (HPT) located at the Cerro Armazones Observatory.[15]
Now, as promised earlier, let’s see what a Dobsonian telescope is.
A Dobsonian telescope is an altazimuth mounted Newtonian reflector telescope design popularized by John Dobson. Dobsonian telescopes feature a simplified mechanical design that is easy to manufacture from readily available components to create a large, portable, low-cost telescope. These are very popular among amateur astronomers.[16] They may be available in both manual and GoTo configurations.
Eyepieces
As already described in the post Optical Elements, an eyepiece, or ocular lens, is a type of lens that is attached to telescopes (and microscopes, etc). It is so named because it is usually the lens that is closest to the eye when someone looks through the device. The objective lens or mirror collects light and brings it to focus creating an image. The eyepiece is placed near the focal point of the objective to magnify this image. The overall magnification depends on the focal length of the eyepiece, as on that of the objective. Reiterating the formula for magnification,

where fo is the focal length of the objective and fe is the focal length of the eyepiece.
An eyepiece consists of several lens elements in a housing, with a barrel on one end. The barrel is shaped to fit in a special opening of the OTA. The image can be focused by moving the eyepiece nearer and further from the objective. Telescopes have a focusing mechanism to allow movement of the shaft in which the eyepiece is mounted, without needing to manipulate the eyepiece directly. This mechanism usually comes in the form of knob just near the interface of the eyepiece and the OTA.
As we have seen in the earlier posts, different telescopes can come with different focal lengths of the objective. So, while buying a telescope the only focal length you need to consider is the focal length of the objective. Eyepiece is an accessory. The commercial telescopes generally come packaged with a default eyepiece (usually with a higher focal length, meaning wider field of view). It is interesting and important to know that telescopes are advertized with a number which refers to the aperture (of the objective), among other things. An eyepiece on the other hand is advertized with a number referring to it’s focal length. Reason is that the aperture of the telescope objective is the most critical deciding factor for a telescope’s power of gathering a good image of the extremely distant objects, focal length of the eyepiece being a factor that can be effectively adjusted or compensated by the use of an appropriate eyepiece. In case of the eyepiece, on the other hand, focal length is the only thing you would have to consider when it comes to choosing between a wider field of view or a bigger image. So, mind it, bigger is not better always! A bigger focal length of the eyepiece means wider field of view (lower magnification) and vice-versa. You would mostly want to use a lower focal length eyepiece if you wish to see planetary objects (to see them bigger). On the other hand, in order to see deep sky objects like nebulae or galaxies, you might want to use a higher focal length eyepiece so as to have a wider field of view.
But wait! Before we go any futher, there is something important to know about field of view (FOV). The field of view being referred to in earlier posts and above is actually the “actual field of view” which means the angular size of the amount of sky that can be seen through an eyepiece, producing a specific magnification. The telescope also contributes to defining this field of view. There is, in fact, another type of field of view, called the “apparent field of view”, which refers to the angular size of the image viewed through the eyepiece, in other words, how large the image appears (as distinct from the magnification). This is constant for any given eyepiece of fixed focal length, and may be used to calculate what the actual field of view will be when the eyepiece is used with a given telescope.[17]
![]()
where FOVC is the actual field of view, FOVC is the apparent field of view and mag is the magnification as defined above.
However, for the sake of deciding which eyepiece to use, might be primarily concerned only about the actual field of view (you want vary how much of the sky you want to really see).
What you read above, about choosing the eyepiece in order to vary the field of view (or magnification), also explains what I meant in the previous post, The showdown, when I mentioned that the drawback of catadioptric telescopes having higher focal lengths can be mitigated by using an appropriate eyepiece. Some available eyepieces have focal lengths like 25mm, 17mm, etc.
Although focal length is the most important property of eyepieces, there are a couple more that are useful to eyepiece selection. They are discussed below.
Barrel diameter
Different telescope tubes have differently sized interfaces for attaching the eyepiece. Eyepieces are thus available in different barrel diameters to attach to the respective telescope tubes. Most commonly available ones are 0.965 inch, 1¼ inch and 2 inch, although there are also adapters available that can be used to fit a mismatched eyepiece into an OTA.[18]
Eye relief
The eye needs to be held at a certain distance behind the eye lens of an eyepiece to see images properly through it. This distance is called the eye relief. A larger eye relief means that the optimum position is farther from the eyepiece, making it easier to view an image. However, if the eye relief is too large it can be uncomfortable to hold the eye in the correct position for an extended period of time, for which reason some eyepieces with long eye relief have soft cups behind the eye lens to aid the observer in maintaining the correct observing position. The eye pupil should coincide with the exit pupil (the image of the entrance pupil) which in the case of an astronomical telescope corresponds to the eyepiece lens glass.
Eye relief typically ranges from about 2 mm to 20 mm, depending on the construction of the eyepiece. Long focal-length eyepieces usually have ample eye relief, but short focal-length eyepieces are more problematic. Until recently, and still quite commonly, eyepieces of a short-focal length have had a short eye relief. Good design guidelines suggest a minimum of 5–6 mm to accommodate the eyelashes of the observer to avoid discomfort. Modern designs with many lens elements, however, can correct for this, and viewing at high power becomes more comfortable.[19]
Now, let’s see the various eyepiece designs. Although not all designs are available in the market today, it is still good to understand the differences and what made the technology evolve. Out of all the designs, Kellner, Plössl, Monocentric, Erfle, König and RKE are the most popular ones. I will try my best not to bore you and keep the descriptions succinct. The designs vary primarily over the lenses used. So, before diving into this section, you might want to revisit the various lenses discussed in the post Optical Elements, unless you remember most of them or just want to skim over this topic.
Negative lens or Galilean
The simple negative lens placed before the focus of the objective has the advantage of presenting an erect image but with limited field of view better suited to low magnification. This type of eyepiece is still used in very cheap telescopes, binoculars and in opera glasses.[20]

Convex lens
A simple convex lens placed after the focus of the objective lens presents the viewer with a magnified inverted image. Since the lens is placed after the focal plane of the objective it also allows for use of a micrometer at the focal plane (used for determining the angular size and/or distance between objects observed).[21]

Huygens
Huygens eyepieces consist of two plano-convex lenses with the plane sides towards the eye separated by an air gap. The lenses are called the eye lens and the field lens. The focal plane is located between the two lenses. Huygens discovered that two air spaced lenses can be used to make an eyepiece with zero transverse chromatic aberration. These eyepieces work well with the very long focal length telescopes. This optical design is now considered obsolete since with today’s shorter focal length telescopes the eyepiece suffers from short eye relief, high image distortion, chromatic aberration, and a very narrow apparent field of view. Since these eyepieces are cheap to make they can often be found on inexpensive telescopes and microscopes.[22]

Ramsden
The Ramsden eyepiece comprises two plano-convex lenses of the same glass and similar focal lengths, placed less than one eye-lens focal length apart. The two curved surfaces face inwards. The focal plane is thus located outside of the eyepiece and is hence accessible as a location where a graticule, or micrometer crosshairs may be placed. The design is slightly better than Huygens but still not up to today’s standards.[23]

Kellner or Achromat
In a Kellner eyepiece, an achromatic doublet is used in place of the simple plano-convex eye lens in the Ramsden design to correct the residual transverse chromatic aberration. Kellner eyepieces are a 3-lens design. They are inexpensive and have fairly good image from low to medium power and are far superior to Huygenian or Ramsden design. The eye relief is better than the Huygenian and worse than the Ramsden eyepieces. The biggest problem of Kellner eyepieces was internal reflections. Today’s anti-reflection coatings make these usable, economical choices for small to medium aperture telescopes with focal ratio f/6 or longer. The typical field of view is 40 to 50 degrees.[24]

Plössl or Symmetrical
The Plössl is an eyepiece usually consisting of two sets of doublets. Since the two doublets can be identical this design is sometimes called a symmetrical eyepiece. The compound Plössl lens provides a large 50+ degree apparent field of view along with relatively large actual field of view. This makes this eyepiece ideal for a variety of observational purposes including deep sky and planetary viewing. The chief disadvantage of the Plössl optical design is short eye relief since the Plössl eye relief is restricted to about 70–80% of focal length. The short eye relief is more critical in short focal lengths below about 10 mm, when viewing can become uncomfortable especially for people wearing glasses. Today it is a very popular design on the amateur astronomical market, where the name Plössl covers a range of eyepieces with at least four optical elements. This eyepiece is one of the more expensive to manufacture because of the quality of glass, and the need for well matched convex and concave lenses to prevent internal reflections. Due to this fact, the quality of different Plössl eyepieces varies.[25]

Orthoscopic or Abbe
The 4-element orthographic eyepiece consists of a plano-convex singlet eye lens and a cemented convex-convex triplet field lens achromatic field lens. This gives the eyepiece a nearly perfect image quality and good eye relief, but a narrow apparent field of view — about 40°–45°. It is called orthoscopic or orthographic because of its low degree of distortion and is also sometimes called an ortho or Abbe (after the inventor). Until the advent of multicoatings and the popularity of the Plössl, orthoscopics were the most popular design for telescope eyepieces. Even today these eyepieces are considered good eyepieces for planetary and lunar viewing. Due to their low degree of distortion and the corresponding globe effect, they are less suitable for applications which require an excessive panning of the instrument.[26]

Monocentric
A Monocentric is an achromatic triplet lens with two pieces of crown glass cemented on both sides of a flint glass element. The elements are thick, strongly curved, and their surfaces have a common center giving it the name monocentric. This design is free from ghost reflections and gives a bright contrasty image, a desirable feature when it was invented (before anti-reflective coatings). It has a narrow field of view of around 25° and is a favorite amongst planetary observers.[27]

Erfle
An Erfle is a 5-element eyepiece consisting of two achromatic lenses with extra lenses in between. They are a logical extension to wider fields of four element eyepieces such as Plössls. Erfle eyepieces are designed to have wide field of view (about 60 degrees), but they are unusable at high powers because they suffer from astigmatism and ghost images. However, with lens coatings at low powers (focal lengths of 20 mm and up) they are acceptable, and at 40 mm they can be excellent. Erfles are very popular because they have large eye lenses, good eye relief and can be very comfortable to use.[28]

König
The König eyepiece has a concave-convex positive doublet and a plano-convex singlet. The strongly convex surfaces of the doublet and singlet face and (nearly) touch each other. The doublet has its concave surface facing the light source and the singlet has its almost flat (slightly convex) surface facing the eye. The design allows for high magnification with remarkably high eye relief — the highest eye relief proportional to focal length of any design (before the Nagler, discussed below). The field of view of about 55° makes its performance similar to the Plössl, with the advantage of requiring one less lens. Modern versions of Königs use improved glass, or have more lenses, grouped into various combinations of doublets and singlets. The most typical adaptation is to add a positive, concave-convex simple lens before the doublet, with the concave face towards the light source and the convex surface facing the doublet. Modern improvements typically have fields of view of 60°−70°.[29]
RKE
An RKE eyepiece has an achromatic field lens and double convex eye lens, a reversed adaptation of the Kellner eyepiece. The name is an abbreviation of Rank, Kaspereit, Erfle (the designs this one is derived from). This design provides slightly wider field of view than classic Kellner design and makes its design similar to a widely spaced version of the König.[30]

Nagler
The main disadvantage to Naglers is their weight. Long focal length versions exceed 0.5 kg (1.1 lb), which is enough to unbalance small telescopes. Another disadvantage is a high purchase cost, with large Naglers’ prices comparable to the cost of a small telescope. Hence these eyepieces are regarded by many amateur astronomers as a luxury.[31]

This concludes our discussion of the integral accessories of telescopes viz. mounts and eyepieces. Next, we will discuss the need-based (nice-to-have) accessories in the post The Luxuries.

3 Comments Add yours